Table of Contents
Introduction: Transforming Coffee into Art
Ever admired those beautiful swirls, hearts, and rosettas on your café latte and wondered, “Can I do this at home?” The answer is yes! Latte art may look like an advanced barista skill, but with the right tools, techniques, and a bit of practice, you can become a latte artist in your own kitchen. This beginner’s guide will take you step-by-step through everything you need to know to start crafting stunning latte art.
Understanding the Basics of Latte Art
What is Latte Art?
Latte art is the method of creating patterns or designs on the surface of a latte by pouring steamed milk into a shot of espresso. It’s a blend of science, skill, and creativity – and it begins with the perfect foundation: well-brewed espresso and properly steamed milk.
The Two Core Elements: Espresso and Milk
- Espresso: A strong, rich coffee base that should have a layer of crema (golden-brown foam) on top. This crema is essential for creating contrast in your latte art.
- Steamed Milk: Silky, microfoam (tiny, consistent bubbles) is crucial for smooth and glossy designs.
Getting Started: Essential Tools for Latte Art
Before you start, make sure you have the right tools. A great artist needs great brushes, and for latte art, your tools are just as important.
1. Espresso Machine:
For authentic latte art, you need a machine that can brew strong espresso and steam milk effectively. If you don’t have one, a stovetop espresso maker with a separate milk frother can work for practice.
2. Milk Frothing Pitcher:
A stainless-steel pitcher with a narrow spout gives you better control when pouring designs.
3. Fresh Milk:
Whole milk is best for beginners because it creates creamy, rich foam. Plant-based milk can also work, but make sure it is barista-grade.
4. Thermometer (Optional):
Helps ensure your milk is steamed to the right temperature (60–70°C or 140–160°F). Overheating can ruin your foam.
5. A Stable Workspace:
A clean, flat surface helps maintain control while pouring your designs.
SIMPLETASTE Milk Frother

Mastering the Art of Steaming Milk
Steamed milk is the canvas of your latte art. If your milk isn’t properly frothed, your designs won’t form correctly. Here’s how to get it right:
Step 1: Pour Cold Milk into the Pitcher
Fill the pitcher up to one-third full. Cold milk froths better, so always start with a fresh, chilled container.
Step 2: Position the Steam Wand Correctly
- Submerge the wand just below the surface of the milk.
- Turn on the steam and let it create a gentle, swirling motion.
Step 3: Create Microfoam
- Allow air to enter the milk by keeping the tip of the steam wand near the surface.
- Once the milk starts to expand, submerge the wand slightly to continue heating without adding more air.
Step 4: Achieve the Right Temperature
- Ideal milk temperature is between 60–70°C (140–160°F).
- The texture should be glossy, smooth, and free of large bubbles.
Step 5: Tap and Swirl
- Gently tap the pitcher on the counter to remove any large bubbles.
- Swirl the milk to maintain a smooth, creamy texture.
The Pouring Technique: Creating Your First Design
Now that you have a perfect shot of espresso and velvety milk, it’s time to create your art. The key is in your pouring technique.
Basic Pouring Steps:
- Tilt the Cup Slightly: This allows the milk to settle under the crema without disturbing it too much.
- Start with a Slow, Thin Stream: Pour from a few inches above the cup to gently mix the milk with the coffee.
- Lower the Pitcher for Design: When the cup is about halfway full, bring the pitcher closer and pour a thicker stream. This is where your design begins to form.
- Move the Pitcher: For a simple heart, pour in the center and pull up at the end. For a rosetta, gently wiggle the pitcher side to side as you pour.
Popular Latte Art Designs for Beginners
1. The Heart
- Start with a thin, steady stream.
- When the cup is halfway full, pour directly in the center.
- Allow the foam to form a white circle, then pull through for a heart shape.
2. The Tulip
- Pour three smaller dots of foam, one after another.
- Pull through the middle of all three to connect them into a tulip shape.
3. The Rosetta (Fern Leaf)
- Pour in a gentle zig-zag motion, slowly moving downward.
- Finish by pulling through the design to create a stem.
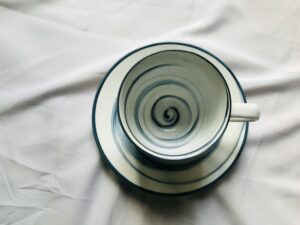
4. The Swirl (Monk’s Head)
- Pour the milk in a circular motion, creating a smooth, consistent white circle on the surface.
5. Simple Leaf (Perfect for Beginners)
- Start with a thick stream in the center.
- Slightly wiggle the pitcher as you pour, then pull through the middle.

Common Mistakes Beginners Make (And How to Fix Them)
Mistake 1: Bubbly or Thin Milk Foam
- Solution: Ensure your steam wand is properly positioned just below the surface of the milk and avoid overheating.
Mistake 2: No Contrast in Your Art
- Solution: Make sure your espresso has a rich, dark crema. Poor-quality espresso or over-frothed milk will make designs difficult to see.
Mistake 3: Milk Pours Too Quickly
- Solution: Control your pour by adjusting the angle of your pitcher and the height from which you pour.
Mistake 4: Designs Spread or Blur
- Solution: Pour slowly and stop when the design reaches the edges of your cup.
Advanced Tips for Perfecting Your Latte Art
- Practice with Water First: Use water and dish soap in your milk pitcher to practice pouring without wasting milk.
- Experiment with Different Milk Types: While whole milk is the easiest to froth, barista-grade oat or almond milk can work well for plant-based designs.
- Try Larger Cups: A larger surface area gives you more space to create complex designs.
- Watch Tutorials: Visual learning is powerful – watch how baristas pour and mimic their hand movements.
FAQs: Crafting Latte Art at Home
Q1: Can I use any milk for latte art?
While whole milk is the best for beginners, you can also use barista-grade oat, almond, or soy milk for plant-based options.
Q2: Do I need an expensive espresso machine for latte art?
No. While high-end machines make it easier, you can still create decent latte art with a stovetop espresso maker and a handheld milk frother.
Q3: Why does my design sink instead of staying on top?
Your milk may be too thin. Make sure you’re creating smooth, velvety microfoam.
Q4: How can I fix large bubbles in my milk foam?
Tap the milk pitcher gently on the counter and swirl it to eliminate large bubbles.
Q5: Can I reheat my milk if it cools down?
No, reheating milk can affect the texture and flavor, making it harder to create smooth designs.
Conclusion: Your Latte Art Journey Begins
Crafting latte art is more than just a skill – it’s an experience. It brings joy to your morning ritual and impresses anyone you serve. Remember, every barista starts as a beginner. With practice, patience, and passion, you’ll soon be creating beautiful hearts, tulips, and rosettas with ease.
So, are you ready to turn your coffee into a canvas? Grab your milk pitcher and start pouring! ☕🎨